A common need when working in a team on wireframes is the possibility to work on the same project simultaneously. This means that the same project must be accessible from different PCs. Also if you own several PCs you might wish to be able to work on the same projects from any of them. This article explains different approaches that you can take to solve this need with WireframeSketcher.
Sharing via a version control system
The most recommended way to share a project across a team is to use a version control system. There are multiple options available and WireframeSketcher can be enhanced to integrate directly with your VCS of choice. There are free plugins available for Git, Subversion, Team Foundation Server and others that will enable you to commit, checkout and merge your projects directly from WireframeSketcher.
We recommend you to use a version control system even when you are the only user editing wireframes. With a VCS you can version your changes, go back to previous versions and generally avoid losing your work.
Sharing via network
If you are not familiar with version control systems, or if setting one up is too much of a hustle, then the next option is to share your projects via network. This generally means that you put your projects in a shared folder, or sync them across different PCs using software like Dropbox, Google Drive, Microsoft OneDrive, iCloud Drive or similar.
Before you go into this direction make sure that you understand the organization of projects used by WireframeSketcher.
Sharing individual projects
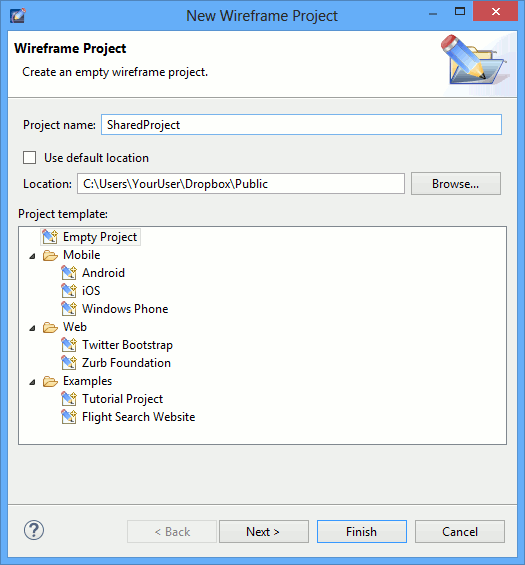
The easiest approach when sharing projects via network is to share individual projects one by one. This is done by creating your project directly under the shared folder instead of it’s default location. For this, uncheck the Use default location option and specify a different location:

One the project is synced, you’ll need to import it into the workspace on the other PC. To import the project follow these steps:
- Select File > Import… > Existing Project into Workspace
- Specify the shared folder in Select root directory (i.e. C:\Users\YourUser\Dropbox\Public)
- Check your project in the Projects list and click Finish
If you wish to share an already existing project then you’ll need to move it manually using these steps:
- Locate the project folder using your system file explorer and move the project to the new location
- Delete the project in WireframeSketcher
- Import the project from the new location using the steps described above
When working with shared projects you’ll be changing editing the same files from different PCs. WireframeSketcher will generally detect changes made by other PCs and refresh the contents in Project Explorer view. However sometimes you’ll want to refresh those changes manually for which you’ll need to right-click on the project in Project Explorer and choose Refresh or press F5.
Sharing entire workspace
Sharing your entire workspace means that you don’t need to place each project one by one under the shared folder. However there is one culprit that you’ll need to avoid. There is a hidden .metadata folder in WireframeSketcher’s workspace which must never be shared. This folder contains information specific to your local instance of WireframeSketcher and sharing it will result in unexpected results and lost data.
With Dropbox you can use the Selective Sync option to exclude .metadata folder from being synced. If your sharing method doesn’t provide such an exclusion mechanism then please use the previous method of sharing each project individually.
Sharing the entire workspace means that you’ll need to move the workspace from its default location to the shared folder. There are two methods for doing this:
- Use a -data command line option. It’s recommended to create a shortcut launcher for WireframeSketcher executable and specify the option there. You can either give the new location directly:
or you can disable the default location in which case you’ll be prompted for a location at startup:WireframeSketcher.exe -data c:\work\ws_wireframes
Use this variant if you need to work with multiple workspaces.WireframeSketcher.exe -data @noDefault - Simply move your workspace directory to a new location and then create a symbolic link that points to it from the default location. This option works best on non-Windows systems.
Once your workspace is synced, the projects won’t be automatically visible on the other PC. On other PCs you’ll need to import projects into the workspace using the steps given in the previous section.